
Rotoscoping: Hollywood’s video data segmentation?
In Hollywood, video data segmentation has been done for decades. Simple tricks such as color keying with green screens can reduce work significantly.
In late 2018 we worked on a video segmentation toolbox. One of the common problems in video editing is oversaturated or too bright sky when shooting a scene. Most skies in movies have been replaced by VFX specialists. The task is called “sky replacement”. We thought this is the perfect starting point for introducing automatic segmentation to mask the sky for further replacement. Based on the gathered experience I will explain similarities in VFX and data annotation.
You find a comparison of our solution we built compared to Deeplab v3+ which was at the time considered the best image segmentation model. Our method (left) produced better details around the buildings as well as reduced the flickering significantly between the frames.
Video segmentation techniques of Hollywood
In this section, we will have a closer look at color keying with for example green screens and rotoscoping.
What is color keying?
I’m pretty sure you heard about color keying or green screens. Maybe you even used such tricks yourself when editing a video using a tool such as Adobe After Effects, Nuke, Final Cut, or any other software.
I did a lot of video editing myself in my childhood. Making videos for fun with friends and adding cool effects using tools such as after-effects. Watching tutorials from videocopilot.com and creativecow.com day and night. I remember playing with a friend and wooden sticks in the backyard of my family’s house just to replace them with lightsabers hours later.
In case you don’t know how a green screen works you find a video below giving you a better explanation than I could do with words.
Essentially, a greenscreen is using color keying. The color “green” from the footage gets masked. This mask can be used to blend-in another background. And the beauty is, we don’t need a fancy image segmentation model burning your GPU but a rather simple algorithm looking for neighboring pixels with the desired color to mask.
What is rotoscoping?
As you can imagine in many Hollywood movies special effects require more complex scenes than the ones where you can simply use a colored background to mask elements. Imagine a scene with animals that might be shy of strong color or a scene with lots of hair flowing in the wind. A simple color keying approach isn’t enough.
But also for this problem, Hollywood found a technique many years ago: Rotoscoping.
To give you a better idea of what rotoscoping is I embedded a video below. The video is a tutorial on how to do rotoscoping using after effects. Using a special toolbox you can draw splines and polygons around objects throughout a video. The toolbox allows for automatic interpolation between the frames saving you lots of time.
This technology, introduced in After Effects, 2003 has been out there for almost two decades and has since then been used by many VFX specialists and freelancers.
Silhouette is in contrast to After Effects one tool focusing solely on rotoscoping. You get an idea of their latest product updates in this video.
I picked one example for you to show how detailed the result of rotoscoping can be. The three elements in the following video from MPC Academy blowing my mind are motion blur, fine-grained details for hairs, and the frame consistency. When we worked on a product for VFX editors we learned that in this industry the quality requirement is beyond what we have in image segmentation. There is simply neither a dataset nor a model in computer vision fulfilling the Hollywood standard.
Search for “roto showreel” on YouTube and you will find many more examples.
How is VFX rotoscoping different from semantic segmentation?
There are differences in both quality and how the quality assurance/ inspection works.
The tools and workflow in VFX, as well as data annotation, are surprisingly similar to each other.
Tools and workflow comparison
The tools and workflow in VFX, as well as data annotation, are surprisingly similar to each other. Since both serve a similar goal. Rotoscoping, as well as professional annotation tools, support tracking of objects, working with polygons and splines. Both allow for changing brightness and contrast to help you finding edges. One of the key differences is that in rotoscoping you work with transparency for motion blur or hair. In segmentation, we usually have a defined number of classes and no interpolation between them.
Quality inspection comparison
In data annotation quality inspection is usually automated using a simple trick. We let multiple people do the annotation and can compare their results. If all annotators agree the confidence is high and therefore the annotation is considered good. In case they only partially agree and the agreement is below a certain threshold an additional round of annotation or manual inspection takes place.
In VFX however, an annotation is usually done by a single person. The person has been trained on the task and has to deliver very high quality. The customer or supervisor lets the annotator redo the work if the quality is not good enough. There is no automatic obtained metric. All inspection is done manually using the trained eye of VFX experts. There is a term called “pixel fucking” illustrating the required perfectionism on a pixel level.
How we trained our model for sky segmentation
Let’s get back to our model. In the beginning, you saw a comparison between our result and Deeplab v3+, 2018. You will notice that the quality of our video data segmentation is higher and has less flickering. For high-quality segmentation, we had to create our own dataset. We used Full HD cameras mounted on tripods to record footage of the sky. This way a detailed segmentation around buildings and static objects can be reused throughout the whole shot. We used Nuke for creating the annotated data.
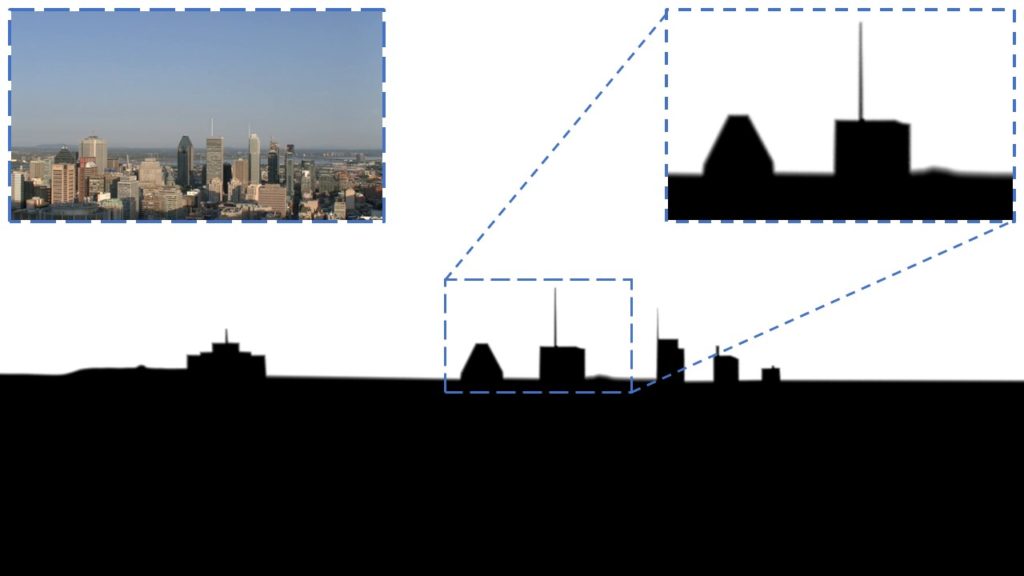
We blurred the edges around the skyline.
Additionally, we used publicly available and license-free videos of trees, people, and other moving elements in front of simple backgrounds. To obtain ground truth information we simply used color keying. It worked like charm and we had pixel-accurate segmentation of 5 min shots within a few hours. For additional diversity within the samples, we used our video editing tool to crop out parts of the videos while moving the camera around. A 4k original video had a Full HD frame moving around with smooth motion. For some shots, we even broke out of the typical binary classification and used smooth edges, interpolated between full black and white, for our masks. Usually, segmentation is always binary, black or white. We had 255 colors in between when the scene was blurry.

Color keying allowed us to get ground truth data for complicated scenes such as leaves or hair. The following picture of a palm tree has been masked/ labeled using simple color keying.
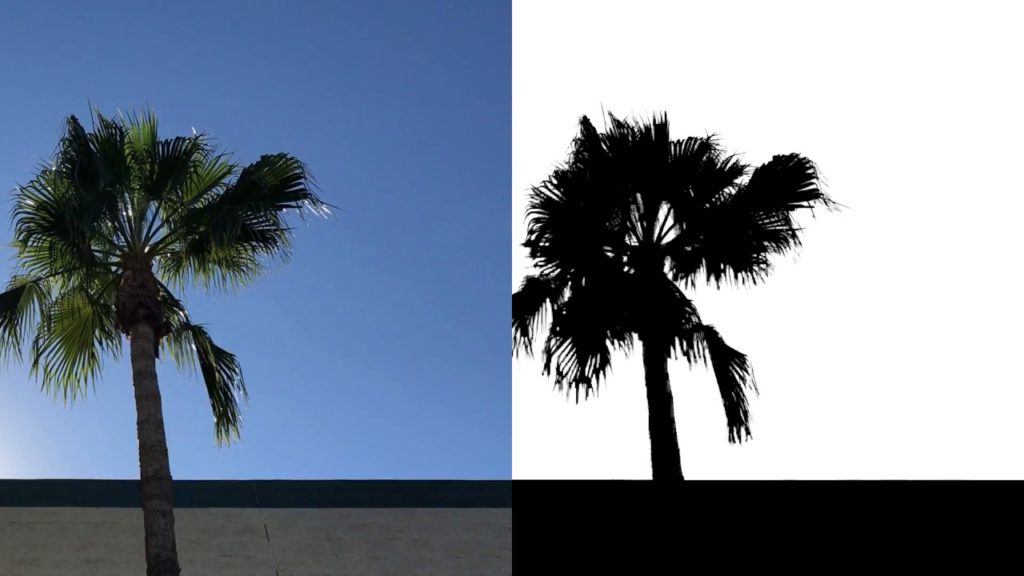
This worked for all kinds of trees. And even helped us obtain good results for a whole video. We were able to simply adapt the color keying parameters during the clip.

To give you an idea of the temporal results of our color keying experiments have a look at the gif below. Note there is a little bittering. We added this on purpose to “simulate” recording with a camera in your hand. The movement of the camera itself is a simple linear interpolation of the crop on the whole scene. So what you see below is just a crop of the full view.
Training the model
To train the model we added an additional loss on the pixels close to the borders. This helped a lot to improve the fine-details. We played around with various parameters and changing the architecture. The simple U-Net model worked well enough. We trained the model not on the full images but on crops of around 512×512 pixels. We also read up on Kaggle competitions such as the caravan image masking challenge from 2017 for additional inspiration.
Adversarial training for temporal consistency
Now that we had our dataset we started training the segmentation model. For the model, we used a U-Net architecture, since the sky can span the whole image and we don’t need to consider various sizes as we would need to for objects.
In order to improve the temporal consistency of the model (e.g. removing the flickering) we co-trained a discriminator which always saw three sequential frames. The discriminator had to distinguish three frames coming from our model or the dataset. The training procedure was otherwise quite simple. The model trained for only a day on an Nvidia GTX 1080Ti.
So for your next video data segmentation project, you might want to have a look at whether you can use any of these tricks to collect data and save lots of time. In my other posts, you will find a list of data annotation tools. In case you don’t want to spend any time on manual annotation there is also a list of data annotation companies available.
I’d like to thank Momo and Heiki who worked on the project with me. An additional thank goes to all the VFX artists and studios for their feedback and fruitful discussions.